
The Peace Bagel with Za’atar and Labneh

I once dated a Palestinian man. He taught me how to make a proper plate of hummus, and he introduced me to za’atar, which turned into a life-long love affair.
Za’atar is a Middle Eastern spice blend made with the herb za’atar, sumac, sesame seeds, and salt (and sometimes undisclosed spices depending on the brand you buy). I love everything about it—it’s strong earthy aroma that you can smell right through the bag, it’s nutty-herby-tart-salty flavor, and the soft and easy way the word za’atar, pronounced zahtar, rolls off the tongue.
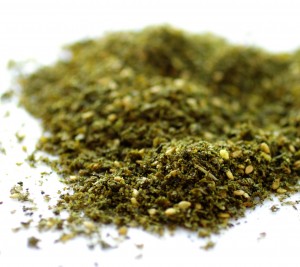
Za’atar spice blend
To start out, I experienced za’atar in its most common and basic way: a bite-size piece of pita bread dipped into a shared bowl of olive oil and then into a shared bowl of the spice blend. As Fahmi explained, every Palestinian household will have bread, oil, and za’atar.
Next came za’atar bread, a heavenly transformation of the same three ingredients—bread, za’atar, and oil. To make, bread dough is topped with za’atar and copious amounts of oil, both of which seep into and perfume the bread as it bakes. I began to purchase za’atar bread regularly from two Middle Eastern markets then in business in Columbus, Ohio, where I lived at the time.
During one memorable summer, when garden-ripe tomatoes were in season, I made a steady weekend breakfast of hot za’atar bread smeared with labneh (yogurt cheese) and adorned with thick, lightly salted tomato slices. I’d fold it over, like a soft taco, and enjoy it with a strong brewed cup of coffee. I thought there could be no better breakfast.
Fast forward to 2013 and DCCC’s foray into George Greenstein’s Secrets of a Jewish Baker, which inspired a long-overdue recreation of those Ohio breakfasts, minus the tomatoes that aren’t available at this time of year.
Greensteins’s book is very wide in scope, and so could just have well have been titled “Secrets of a Jewish, Middle Eastern, Italian, Austrian, Indian, French, Russian, or American Baker.” I began my za’atar-bread-baking streak with Greenstein’s recipe for plain pita bread, which I anointed with za’atar and oil before popping into the oven. I then tried his Za’atar Herbed Rolls, which turned out to be small, puffy flat breads with finger tip indentations that had za’atar mixed into the dough as well as sprinkled on top. About four inches in diameter, they are the perfect size for lamb burgers. To complement the breads I made homemade labneh, one of the easiest cheeses to make at home. (It’s the white stuff in the photos.) A description of how to make it is included at the end of this posting.
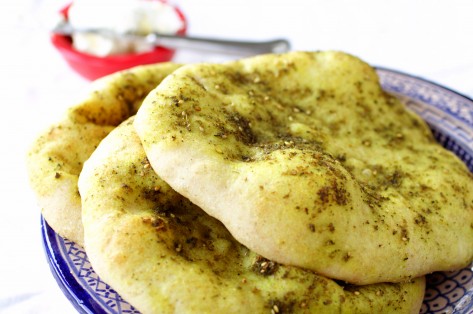
Greenstein’s pitas transformed into za’atar breads
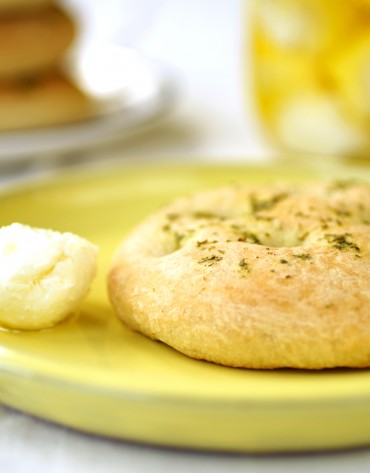
Greenstein’s za’atar rolls
Before moving on to the next DCCC pick (hint: it’s Breath of a Wok), I wanted to try Greenstein’s bagel recipe, and yet I wasn’t ready to give up my za’atar. Thus was born the Peace Bagel, combining a quintessentially Arab, and in particular Palestinian, spice blend that happens to also be enjoyed by Israelis with an iconic NYC bread that has its roots with the Ashkenazic Jews of Europe.
But there is also an Arab bagel, making this peace bagel concept even more multi-layered. This I discovered while reading Yotam Ottolenghi and Sami Tamimi’s book Jerusalem: A Cookbook (2012/Ten Speed Press). Sadly, I also discovered from the same authors that my peace bagel is also more poignant than I could have guessed:
Regrettably, za’atar has joined the long list of thorny subjects poisoning the fraught relationship between Arabs and Jews, because Israel declared the herb an endangered species and banned picking it in the wild. Although a compelling argument was made about preserving the dwindling population of wild za’atar, the decree was taken without any dialogue with the Arabs, who see it as a deliberate violation of their way of life.
Please know that this unorthodox bagel conception is mine, not Greenstein’s; so I take all credit and blame for it. In fact, I thought the conception was all mine until I did a quick web search for “za’atar bagel.” I discovered that the Olde Brooklyn Bagel Shoppe in Brooklyn, NY, makes a za’atar bagel. The owners are Palestinian-American.
And, those Arab bagels? Another common name is Jerusalem bagels. Unlike the round, dense NYC bagels, they are lighter, larger, and oval-shaped and are not boiled before being baked. They are topped with sesame seeds and are commonly enjoyed with za’atar—either sprinkled on the interior once split or served on the side with olive oil for dipping.
A Bagel Making Primer
Before delving into the bagel recipe, I want to share some basic bagel tips I’ve learned over the last several weeks of bagel making experiments. I’ve included a method for making labneh at the very end of this posting, following the bagel recipe.
Flour. According to numerous bagel aficionados, true NYC-style bagels are made with high-gluten flour, which has more gluten-making capability than regular bread flour: more gluten = a chewier texture. No doubt because high-gluten flour is not easily available to the home baker, Greenstein calls simply for bread flour. I have had good luck using bread flour with plenty of kneading to develop the gluten. If you do want to experiment with high-gluten flour, the easiest source for home bakers that I know of is Sir Lancelot flour from King Arthur Flour.
Kneading, how to. Greenstein uses the typical ¼-turn kneading to bring the dough into a ball. Then, when it’s no longer sticky to the touch, he picks it up and stretches it to develop elasticity. He then kneads once or twice more and then stretches again. He repeats this several times, then lifts the dough and drops it onto the work surface, lifts once more, turns over, and drops it again. He repeats the process—stretching, dropping, and kneading. This helps to aerate the dough.
Here are links to three videos that I found helpful in augmenting Greenstein’s written instruction: video one, video two, video three.
I do not include instructions for kneading the dough with a stand mixer, though many recipes do. After less than 5 minutes of kneading, my Kitchen Aid motor began to smell hot, and back to the wood work surface I went.
Kneading, how long? Bagel dough is a work out. It’s stiffer than other bread doughs and, in order to result in bagels with the classic chewy texture, it needs to be kneaded for a sufficient amount of time to develop the gluten. As far as I know, the danger of over kneading (or working) any wheat-based dough/batter is a final product with a tough texture. (A muffin, which should be mixed for about 10 seconds is, by contrast, at the farthest end of the other desired texture spectrum.) With bagels, however, I imagine there is more danger of under kneading rather than over kneading.
Forming. This, along with applying the toppings, is the most fun part of making bagels. And, according to Greenstein, hand-rolled bagels taste better than machine-formed ones, which is how most, but not all, bagel shops now make them. I found an incredible video of a “human bagel machine,” a skilled bagel maker so deft and skilled at his work that the bagels practically fly off his hands.
This video shows my friend Lynne forming bagels, lead by the example of the human bagel machine. It can take a few tries to get the hang of it.
Click here to see the full video of the human bagel machine
Bagel toppings. Za’atar can be purchased from Middle Eastern markets or from spice purveyors such as Penzeys. Of course you don’t have to top your bagels with za’atar. You can use anything you like—poppy seeds, sesame seeds, garlic, coarse salt, an “everything bagel” spice mix. Rather than laying the boiled bagel onto a plate with toppings, as Greenstein does, some folks recommend brushing an egg wash onto the boiled bagels before sprinkling on toppings (1 egg white whisked with 1 tablespoon of water). I’ve tried both ways and find that the latter method does marginally help the toppings to adhere to the bagels once baked. However, I prefer the fluid and fun 1-2-3 motion of briefly draining a boiled bagel on a towel, flipping it over onto your topping of choice, and then placing it directly on the baking sheet. Note: Because of Za’atar’s fine texture, it adheres very well without the aid of an egg wash.
Baking with steam. With the exception of Greenstein’s recipe and one I found online (click here), most bagel recipes for the home cook do not instruct you to bake with steam. I tried baking them with and without steam. The verdict: Bake with steam if you want a classic bagel texture—one with a noticeably crusty exterior that contrasts with a moister, softer interior that is nonetheless chewy and dense. Even baked without steam, however, homemade bagels will be far better than most bagels available in most areas—except for bagel meccas, like NYC, of course.
There are lots of different ways to create steam when baking in the home oven. I found researching content online helpful, in particular the Fresh Loaf forum and the description of different steaming approaches found on a site called The Artisan.
Greenstein suggests placing an empty roasting pan or other heavy pan on the floor of the oven, preheating it so it gets good and hot, and then, when ready to bake, placing the bread in the oven, and carefully tossing six or seven ice cubes into the hot pan or carefully pouring in 1 cup of boiling water, wearing a long sleeved oven mitt. The only problem with his instruction is he doesn’t account for those of us who have an electric oven. In that case, the pan will have to go on a bottom rack.
My solution, based on a tip from a friend of mine who is a professional baker, was to use fire bricks as my steam-producing material. In my oven, the bricks permanently sit in a rimmed sheet pan on the bottom rack. (A sheet pan of bagels can be placed directly on the fire bricks, if you do not have a total of three oven racks.) I do a combination of placing ice cubes directly on the preheated bricks, and sometimes augment that a good dousing of room temperature water that I pour directly on the bricks from a long-spouted watering can, enabling me to pour the water at a safe distance. (You do not want a steam burn!) The bricks have the added advantage of radiating heat and helping to maintain the temperature when the oven door is opened.

Fire bricks for steam and heat placed on bottom shelf of electric oven, with pizza stone above
Steam is always applied upon first placing the bread in the oven and sometimes a second or third time, depending on the recipe. The nice thing about using ice cubes is that you can hear them hissing as they melt in the extreme heat. When you no longer hear the hissing sound, you know it’s time to add more ice cubes. Because bagels are baked for a relatively short time, they receive one initial burst of steam.
And by the way, the same friend who recommended fire bricks told me I should set my oven temperature to about 100 degrees higher than what a bread recipe calls for because a typcial home oven will lose about 100 degrees when the oven door is opened. Once the bread is inside, reduce the temperature. An oven thermometer will help you more accurately regulate the oven temperature, and judge how much heat is lost when you open the oven door.
A Recipe for Peace Bagels
This recipe is for dense, chewy, NYC-style bagels, not the lighter-textured Arab, or Jerusalem, bagels.
Makes 12 large bagels
2¼ cups warm water (about 110°F)
1 heaping teaspoon active dry yeast (½ package)
1 tablespoon vegetable oil
3 tablespoons malt syrup
6 to 7 cups bread flour
1 tablespoon fine-grained sea salt
Za’atar spice blend
In a large bowl, sprinkle the yeast over the warm water and allow to soften (about 2 minutes). Add the oil, 2 tablespoons of the malt syrup, 6 cups of the flour, and the salt. Mix thoroughly until the dough forms and comes away from the sides of the bowl.
Kneading. Turn out onto a lightly floured work surface and, with lightly floured hands, knead, adding small amounts of flour ¼ cup at a time as necessary. Bagel dough should be stiff. Work in as much extra flour as you can comfortably knead, but not so much that the dough does not come together into a cohesive ball (that’s a sign that the dough is too dry). The dough will soften slightly as the gluten develops. Knead until smooth and elastic (15 to 18 minutes, depending on your muscular strength and perseverance).
Rising. Roll the dough into a ball, place in a large oiled bowl, and turn to coat. Cover with plastic wrap and let rise fully, until an impression made with your finger remains and does not sink into the dough (1 to 1½ hours, depending on the time of year and how warm/cold your home is; I live in an uninsulated, Victorian home in Vermont, so my dough took 1½ hours).
When the dough is close to being fully risen, preheat the oven to 500°F and line two baking sheets with parchment paper. If using steam, have your mechanism for producing steam—a pan, fire bricks, etc.—in place so that it preheats.
Shaping. Punch the dough down, cut into thirds, and roll each piece into a rope. Cut each rope into 4 equal pieces. Roll each piece into a rope 2 inches longer than the width of your hand. Flip the rope around the base of your fingers to form a ring, with the ends overlapping about ½ inch. Squeeze the overlapping ends together, then seal the ends by rolling with your palms on the work surface. If the dough slides and resists rolling, dab on a drop of water with your fingers. With the bagel still looped around your fingers, very gently crimp the bagel all round to help even out the thickness. Evenly space the bagels on the prepared baking sheets. Cover and let stand until puffy (10 to 20 minutes).
Boiling and Garnishing. While the bagels are proofing, prep the bagel boiling water: Fill a large saucepan two-thirds full with water (or until there is at least 4 inches of water in the pan), add the remaining 1 tablespoon of malt syrup, and bring to a boil. Spread the za’atar spice blend (or other desired toppings) in plates.
Carefully lower 2 or 3 bagels at a time into the boiling water. Do not over crowd them. The bagels should float to the top of the water quickly. Once risen, boil for 1 minute, flip over, and boil an additional 45 seconds to 1 minute.
Carefully lift each bagel with a slotted spoon or skimmer. Drain briefly on a clean kitchen towel, immediately turn into the topping of your choice, pressing lightly, then flip over and place topping-side up on the prepared baking sheet. Repeat with each bagel, evenly spacing them 6 to a baking sheet.
Baking. Bake, ideally with steam, turning the pan and alternating the location of the trays mid-way through baking, until well-browned on both sides (15 to 18 minutes total).
Note: Once boiled, bagels should go into the oven as quickly as possible. So that the first baking sheet of boiled and garnished bagels didn’t sit for too long while waiting for the next six to be boiled and garnished, I place the first completed tray in the oven and set the timer to the mid-point (8 minutes in my oven). By then the second tray is completed.
Adapted from George Greenstein’s bagel recipe in Secrets of a Jewish Baker (2007 / Ten Speed Press)
The Labneh Primer
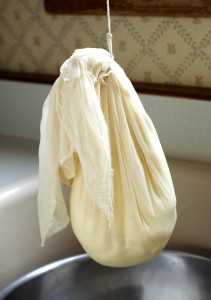
Labneh draining
Labneh is simply ultra-strained plain yogurt that’s been seasoned with salt. To make, get yourself some plain yogurt, homemade (click here for directions) or store-bought. Season with salt to taste (I used 2 teaspoons fine-grain sea salt for 10 cups yogurt) and hang in a bundle of 4 layers of dampened cheese cloth (or 2 layers of butter cloth) to drain for 24 to 30 hours. Once strained, it is ready to eat and can be stored in a container in the fridge for a couple of weeks.
Alternatively, for longer storage, scoop up tablespoonfuls of the cheese, form into balls with your hands (wet hands help), place on sheet trays, not touching, and drape with cheesecloth. Leave the labneh balls at room temperature (if hot, place in the fridge) to dry until they no longer feel tacky to the touch and when they no longer leave an imprint of yogurt on your finger when you touch a ball, 2 to 3 days. Place the balls in a clean, glass jar and pour in olive oil to cover. Store at room temperature out of the light or in the refrigerator for up to a year. (If stored in the fridge, the cold temperature will conceal the oil; simply remove from the fridge an hour or so before eating to let come to room temperature.)
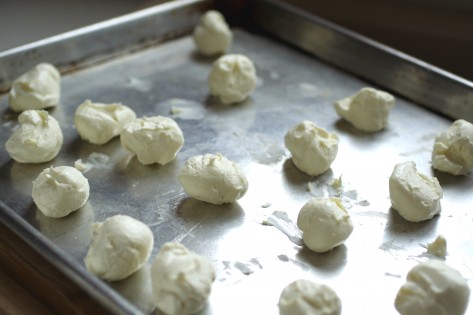
Labneh balls drying
just pinned to pintrest, yummy
1Thanks for sharing the Peace Bagel on pintrest, Deonna.
2