Queso Fresco

(Adapted from Diana Kennedy’s recipe in The Art of Mexican Cooking)
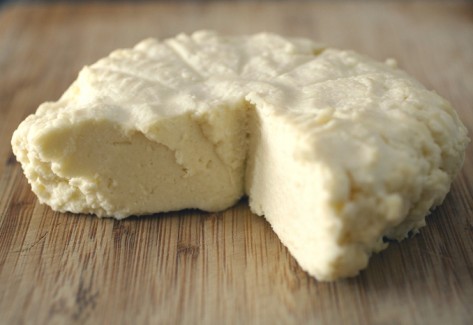
This soft, crumbly white cheese, whose name means literally “fresh cheese,” is used in a variety of ways in Mexican cooking. According to Diana Kennedy, author of the current DCCC pick, it may be eaten uncooked as a snack with drinks, crumbled on top of various cooked foods, such as enchiladas and soups, or cut into strips for chiles rellanos and other dishes.
As queso fresco is used in a number of egg dishes and red pozole, a famous Mexican soup, that I’d planned to make, I looked for it at the specialty foods market in my town. Unfortunately, it was not available, even as a special order. (Having made homemade feta cheese for the club’s last book, I thought I would go the easy route this time around.) As it turns out, I’m glad it wasn’t available, because now I know, having been forced to make it by necessity, that queso fresco is easy to make and less involved than feta.
The method that follows is adapted from Diana Kennedy’s recipe for queso fresco in The Art of Mexican Cooking, which seems easier than some others I referenced. (One recipe called for applying 35 pounds of pressure; I couldn’t begin to figure out what I might have at that weight that would fit nicely on a small piece of cheese.) Though this is a simple fresh cheese, the curds hang for 36 to 48 hours and are then cured in a perforated mold at room temperature for several more hours—up to two days—giving the cheese a delicate acidity and improved flavor.
After sampling my batch of queso fresco, my friend Bhakti, who has eaten this cheese while in Mexico, remarked that it is identical in flavor and texture to what she ate there, which made me very happy. So I if you’re looking for an authentic queso fresco, this is it.
Important Tip: When making cheese, use stainless-steel pots and utensils, and be sure to sanitize everything before beginning.
Makes about 1½ pounds
1 gallon whole milk, preferably raw (see Notes)
⅛ teaspoon liquid rennet diluted in 2 tablespoons unchlorinated water
2½ teaspoons fine-grain sea salt
Equipment
A large stainless-steel pot
A thermometer
A large stainless-steel spoon for stirring
Measuring spoons
A long knife for cutting curds
Fine cheesecloth (sometimes called “butter muslin”) or multiple layers or regular cheesecloth String for hanging the curd
Small perforated mold or basket (see Notes)
1. Heat the milk to 110°F, stirring occasionally. Stir the diluted rennet into the milk; keep stirring for about 30 seconds to ensure an even distribution of the rennet. Cover the pot and let rest, undisturbed, in a warm place for 45 minutes to 1 hour, to allow the milk to set. (Here are some ideas for a “warm place,” which is sometimes a challenge in a northern climate: Find a sunny or otherwise warm spot—near a woodstove, electric heater, or radiator for example—away from drafts and wrap the pot with a large towel or small blanket to insulate it or place the pot in a sinkful of warm water—around 105°F—checking the temperature of the water from time to time to make sure it remains warm and adding more hot water as needed.)
2. The milk should have coagulated, forming curds. When the curds are set they will feel firm the touch. To test, insert a clean finger or flat object into the curd at a 45-degree angle and slowly remove it. The edge of the break should look “clean,” or even, rather than ragged, and the depression will fill with whey. If the edge looks rough or ragged, or the depression fills with milky whey, let sit another 15 to 30 minutes.
3. With a long knife, cut the curds, as evenly as possible, into 1½-inch cubes. After making cuts across the curd in one direction, and then another set perpendicular to the first, use one hand to gently lift up and expose the side of the curd block so that you can make lateral cuts to form the cubes.
4. Let rest for 2 hours or so to allow the whey to drain from the curds. Drain off the whey and transfer the curds to cheesecloth. Gather up the ends of the cheesecloth to form a bundle and hang the curds to drain, with a receptacle underneath to catch the whey, for 36 to 48 hours, depending on the humidity. (I let mine hang 43 hours.) Diana Kennedy describes the ideal texture of the curds as being firm and slightly moist at the center.
5. Transfer the hung curds to a food processor. Add the salt and process until the texture is fine—Diana Kennedy describes the texture as “fine bread crumbs.”
6. Using your hands, gently press the broken up curds together to form a compact ball or disc that is slightly smaller than the diameter of your mold. Place the cheese in the mold and press gently. Set the mold on a rack over a sink or a tray to catch any additional whey that may drain. Place a grease splatter screen, an inverted sieve, or a small piece of clean cheesecloth over top of the mold to allow air to circulate but keep flies or anything unwanted from landing on your cheese.
7. After 6 hours, very gently turn the cheese over and continue draining (see Notes). Once the cheese feels compact, you may turn the cheese out of the mold and let it continue to dry, and ferment, on the rack in a well-ventilated place at room temperature for another 12 to 18 hours, turning the molded cheese about every two or three hours—or when you think of it. (I let mine ferment for the better part of two days; I tried it after one day, and then again the second day, and noticed an increased acidity and improved flavor by the second day—it is worth the wait.) While the cheese is curing place an inverted strainer over top of it or loosely drape a clean piece of cheesecloth on top of it.
8. Store in the refrigerator, using it within 1 week, or freeze for later use.
Notes: Diana Kennedy prefers to use raw milk when making this cheese; however, if pasteurized milk is what you have available, she suggests adding ¼ cup of plain yogurt to the milk at the same time the rennet is added. I used raw milk because I have easy access to it and it is preferred for cheesemaking. If you have concerns about consuming fresh cheese made with unpasteurized milk (or will be serving it to others who may), but would like to use fresh raw milk for superior cheese, you may home pasteurize raw milk by heating it 161°F over low heat while stirring frequently to avoid scalding it. Set the milk in an ice bath to reduce the temperature to 110°F and continue with Step 1.
 Ideally, the mold should about 4 to 5 inches in diameter and 2 to 3 inches tall. I improvised and used the basket in my salad spinner, which is 6 inches across and much taller than needed.
You may find that the curds do not continue to release whey while curing in the mold and on the rack. During the curing period, the cheese I made did not release any additional whey. This may be because I hung the curd longer than necessary (Vermont winters are quite dry; and yes, it’s still very much winter here).

Hi Holly!
1Loved this! I remember seeing a link you posted for cheese making starters on the feta cheese recipe. Don’t see Peter too often now that his Mom is no longer living here but I have to check if the Coop in town sells the liquid rennet. Thanks for a very interesting post!
Charlie
I’m glad you liked it Charlie. I think the Rutland coop carries liquid rennet and, if not, I bet they would order it for you. If you make the queso freso (or feta), please give me (and the multitude of other beginning cheese makers out there) feedback.
2